header

10/23/2016

Shodo Online Lesson 6, Kanji Sample 林 woods - Shodo with a Brush Pen


First, download and print a practice sheet here

.

Now let's try kanji with radicals.

You are going to write a kanji with "木" ki (tree).
When you look at kanji, you may notice that there are some common parts.
For example, "村" mura (village) and "机" tsukue (desk) have the same parts on the left.
These common parts are called "部首" bushu (radicals).
Depending on the radical, it is on the left, right, top, or bottom.
This radical, 木, usually comes on the left.
As you might guess, kanji with radical "tree" are related to a tree.
Let's take a look at the kanji below.


woods

This is today's sample "林" hayashi (woods). Two "tree" stands for "woods".
You may think it's just two "tree", but the left and right parts have some differences.

In general, when you draw radicals on the left, draw it within the 40% as pictured below.
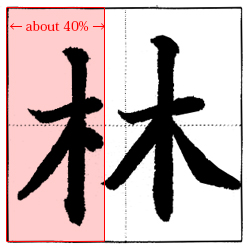
40% radical

It looks better if the right side of radical lines up on the 40% line.

woods good and bad ones

This theory also holds true for other radicals as shown below.

radicals on the left

Now Let's go back to "woods".
In terms of the "tree" on the right, it is drawn the same way that I showed in the past article.
Please refer to the link below.

Shodo Online Lesson 3, “Left Sweep” and “Right Sweep”

The "tree" on the left is not symmetrical.
The left half is longer.
And also make sure the fourth stroke is "stop" (止め), and not "sweep" (払い).


How was this lesson?
If you would like more practice, I prepared a practice sheet for radical "tree".
Please download and print the practice sheet.
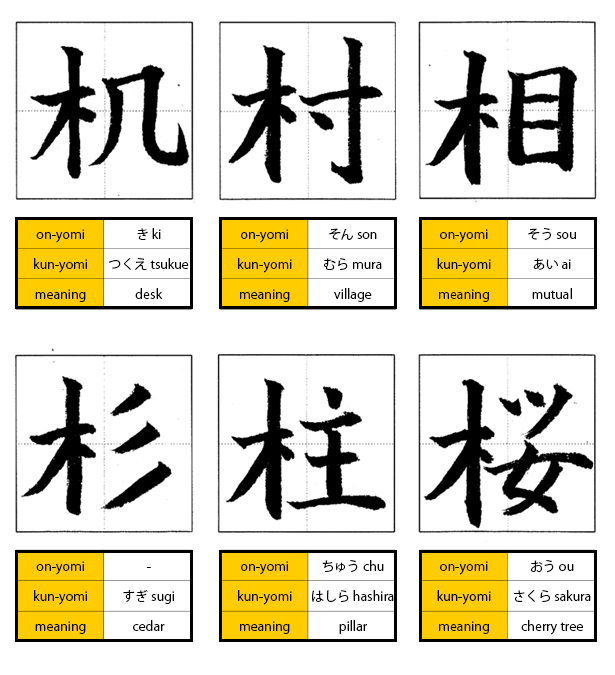
kanji with radical tree

10/16/2016

Shodo Online Lesson 5, Kanji Sample 王 king - Shodo with a Brush Pen


First, download and print a practice sheet here

.


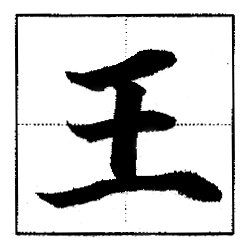
Today's kanji is "王 ou", meaning "king".


This kanji consists of simple strokes: three horizontal stokes and a vertical stroke.
Please refer to the past articles that show how to draw horizontal strokes and vertical strokes.

Shodo Online Lesson 1, “Start of Strokes” and “End of Strokes”

Shodo Online Lesson 2, “Horizontal Strokes” and “Vertical Strokes”


The stroke order is ①horizontal stroke, ②vertical stroke, ③horizontal stroke and ④horizontal stroke.
There are two things that you have to be careful about.

First, make sure the stroke ① and ② are almost the same length, and the stroke ④ is the longest.


The second thing is directions of the three horizontal strokes.
The stroke ① curves slightly upwards, the stroke ③ is flat, the stroke ④ curves slightly downwards.
This way, the character looks well-balanced.


This technique can be applied to other letters : 「三」、「玉」、「羊」

Please try writing these characters!

10/10/2016

Shodo Online Lesson 4, “Continued Line”

Shodo Lesson4!

All Kanji consists of strokes.
In the previous lessons, you have learned Horizontal Strokes(横画 yokokakau), Vertical Strokes(縦画 tatekakau), Left Sweep(左払い hidariharai) and Right Sweep(右払い migiharai).
I believe you can already write various Kanji!
Now you are going to learn how to draw a "Continued Line(転折 tensetsu)".


Step 1


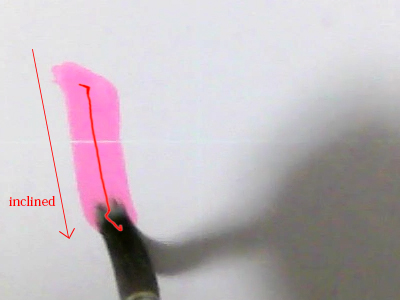
Draw a vertical stoke, however, this time, make sure the line is a little inclined.


Step 2


The next stroke is the main theme of the lesson. First, draw a normal horizontal stroke, and when the brush reaches where you want to turn, put pressure on the brush(A).


Step 3


Without lifting the brush off of the paper, move it downwards.
The vertical line should be thicker than the horizontal one because of the applied pressure at point "A".
And this vertical line must also be a little inclined.
This makes the character well-balanced.

Step 4


Draw a horizontal line to "close the mouth".